
Home
1.0 FreeWRL Reason Software Interface
This page is divided into 3 areas:
- X3D nodes added to FreeWRL to enable ReWire and MIDI interfacing;
- Javascript methods added to allow manipulation of configuration at runtime;
- Tutorials (Examples and tests).
Last updated July 26, 2009.
Table of contents
1. Tutorials and Examples
1.1 General Hints and Tips
1.2 MIDI Keyboard Controlling X3D
1.3 MIDI Controllers Controlling X3D
1.4 Sending note values to a Reason Synth
1.5 Sending note values to a Reason Synth - test 2
1.6 Sending controller values to a Reason Synth
1.7 Complex MIDI Keyboard Example
1.8 using AudioControl to control a Reason Synth
2. X3D Nodes added to FreeWRL
2.1 MidiControl X3D Node
2.2 AudioControl X3D Node
2.3 MidiTime X3D Node
3. Javascript Additions
3.1 getMidiDeviceList()
3.2 getMidiDeviceInfo(x)
3.3 getMidiControlMin(x,y)
3.4 getMidiControlMax(x,y)
3.5 getMidiControlNumber(x,y)
1. Tutorials and Examples
These tutorials assume that you have an OS X computer with FreeWRL and Reason installed. If you do not have Reason, you may wish to download a demo version from Propellerheads. You may also wish to have two other pieces of software - MIDI Keys and MIDI Monitor.
You will find an archive file containing the following examples here.
1.1 General Hints and Tips
Here is a list of hints and tips:
- If you are using Reason, start FreeWRL first, then start Reason. when exiting the program, stop Reason first.
(this has to do with Reason looking for a ReWire host on startup, and expecting it to exist for "ever")
- If you don't follow the above advise, Reason will not know that a ReWire session is desired, so
Reason will not communicate with FreeWRL.
- If FreeWRL closes before Reason (crash, quit, etc) then Reason will be left hanging. You might have to
Force Quit Reason; to do this, click on the apple (top left of your screen) then down to "Force Quit". A
window will appear, and Reason should be in it. Click on Reason, and quit it.
- To find the names of Reason devices, look for the name on the white tags on the Reason rack and mixer;
note that FreeWRL expects
the correct case. (ie, the match is currently stringent). eg, "SubTractor 1" is used in these examples.
- To find the names of controllers for a Reason device, leave the mouse over the controller for a short
while. The controller name, and the current value will be displayed.
We have a list of Reason devices and controllers
here.
- The ReWire code will speak to you if you have an error; it will not display anything on the screen.
Make sure your speakers are turned on!
- Due to the design of ReWire, only one
VRML/X3D file with MidiControl nodes in it can be run at one time.
- External MIDI devices are not currently fully queried; right now MIDI devices can send Note On/Off messages send Controller information. More information can be found here.
1.2 MIDI Keyboard Controlling X3D
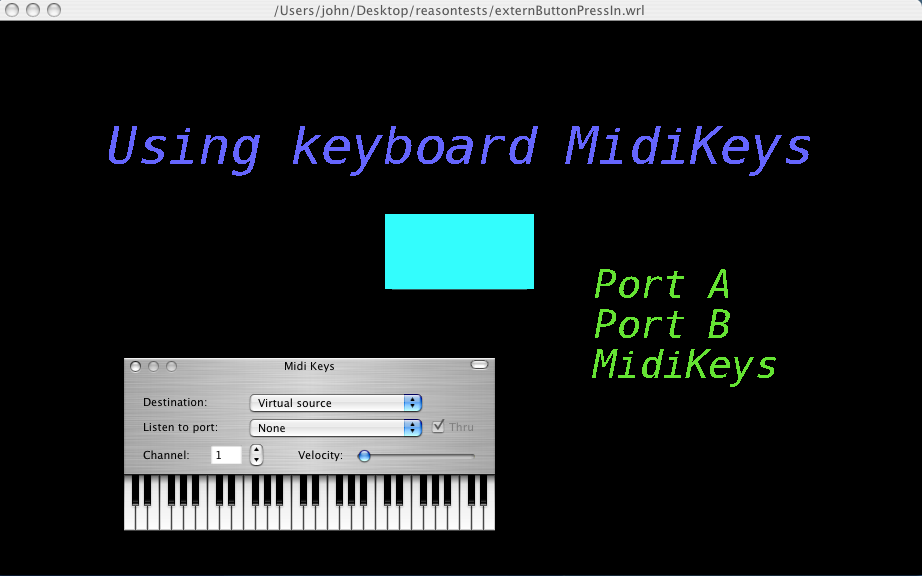
The following example (externButtonPressIn.wrl in the download files) will take a value in from a MIDI keyboard and changes the vertical location, based on which key is pressed on the selected keyboard. The list of possible inputs is shown on-screen, as well as the selected input. There is also a DirectionalLight that is turned on when the freewrl MIDI code is running.
Click on the picture to see what the test looks like with "MidiKeys" and a "MidiSport 2x2" connected.
The full X3D program is in the download files, points of interest are shown below.
...

##################################################################
#
# do the MIDI keypress. Note press on MIDI keyboard should make box go up and down.
#
DEF RW3 MidiControl { autoButtonPress FALSE controllerType "ButtonPress" }

Transform {
   children [
      DEF LIGHT DirectionalLight {
         ambientIntensity 0.8
	on FALSE
      }

      DEF BOX2 Transform {children
        Shape{
          appearance Appearance{material Material{
		emissiveColor 0.2 0.2 0.2 diffuseColor 0 1 1}}
          geometry Box{size 2 1 2}}
      }
]
}

DEF PO2 PositionInterpolator { key [ 0.0 0.5 1.0 ] keyValue [ 0 -5 0, 0 0 0, 0 5 0] }

# turn light on
ROUTE RW3.controllerPresent TO LIGHT.on

# MIDI key Value moves the box
ROUTE RW3.floatValue_changed TO PO2.set_fraction
ROUTE PO2.value_changed TO BOX2.set_translation

...

##################################################################
#
# script to look for keyboard controllers.
#
DEF LOOKER Script {
	field SFInt32 evcount 0
	field SFString mydevice ""
	field SFInt32 oldLen -10
	eventOut SFString midiDevice
	eventOut MFString newText
	eventOut MFString allText

	url   "javascript:
	function eventsProcessed () {
		if (evcount == 100) {
			evcount = 0;
			mylist = getMidiDeviceList();
			if (mylist.length > 0) {
				mydevice = mylist[mylist.length-1];
			} else {
				mydevice = '';
			}

			// did the device change?
			if ((mydevice != midiDevice) || (mylist.length != oldLen)) {
				oldLen = mylist.length;
				midiDevice = mydevice;
				if (mydevice == '') {
					newText = new MFString('keyboard no longer present');
				} else {
					newText = new MFString('Using keyboard ' + mydevice);
				}
				allText = new MFString();
				allText = mylist;
			}
		}
		evcount ++;
	}
	"
}

ROUTE LOOKER.midiDevice TO RW3.deviceName
ROUTE LOOKER.newText TO SCREENTEXT.string
ROUTE LOOKER.allText TO ALLTEXT.string
1.3 MIDI Controllers controlling X3D
The following example (externFaderIn.wrl in the download files) will take a value in from MIDI fader/sliders and change the position of the box (and, make it spin).
#VRML V2.0 utf8
#
# use the Volume knobs on external devices to move a box. the Devices are connected to a M-Audio
# MIDISport 2x2 port A, and are set to MIDI channels 1, 2, and 3.
#
DEF ROOT Transform { }

DEF RW1 MidiControl { deviceName "M2x2" controller "Volume (Coarse)" channel 1 useIntValue TRUE}
DEF RW2 MidiControl { deviceName "M2x2" controller "Volume (Coarse)" channel 2 useIntValue TRUE}
DEF RW3 MidiControl { deviceName "M2x2" controller "Volume (Coarse)" channel 3 useIntValue TRUE}


DEF BOX1 Transform{children
        DEF BOX2 Transform {children
                Shape{appearance Appearance{material DEF MAT1 Material{diffuseColor 0 1 1}}geometry Box{size 2 1 2}}
        }
}

DEF CP1 OrientationInterpolator { key [ 0.0 0.5 1.0 ] keyValue [ 0.0 1.0 0.0 6.28, 0.0 1.0 0.0 3.14, 0.0 1.0 0.0 0.0, ] }
DEF PO1 PositionInterpolator { key [ 0.0 0.5 1.0 ] keyValue [ -5 0 0, 0 0 0, 5 0 0] }
DEF PO2 PositionInterpolator { key [ 0.0 0.5 1.0 ] keyValue [ 0 -5 0, 0 0 0, 0 5 0] }


DEF CLOCK1 TimeSensor { cycleInterval 4.0 loop TRUE enabled FALSE }

# device on Channel 3 will route here:
ROUTE RW3.intValue_changed TO CLOCK1.enabled
ROUTE CLOCK1.fraction_changed TO CP1.set_fraction
ROUTE CP1.value_changed TO BOX1.set_rotation

# vertical is controlled by the device on Channel 1.
ROUTE RW1.floatValue_changed TO PO2.set_fraction
ROUTE PO2.value_changed TO BOX2.set_translation

# horizontal is controlled by the device on Channel 2.
ROUTE RW2.floatValue_changed TO PO1.set_fraction
ROUTE PO1.value_changed TO BOX1.set_translation
Notes:
- We use two devices for inputting control values; a MIDI Brain with Fader eeprom from PAIA and, we have used some of the MIDI out examples with a single board computer, the Arduino project.
1.4 Sending note values to a Reason Synth
The following example (reasonAutoKey.wrl in the download files) will send a series of notes to a reason file. Start up reasonAutoKey.wrl, then start up reason with the file SubTractor.rns (again, located in the example files). The FreeWRL window will be black, but the synth in reason should receive notes, and continuously loop a chromatic scale.
Here is the X3D listing:
#VRML V2.0 utf8
DEF ROOT Transform { }

DEF RW1 MidiControl {
        deviceName "SubTractor 1"
        minVal 40
        maxVal 90
        useIntValue FALSE
        autoButtonPress TRUE
        pressLength 0.6
        controllerType "ButtonPress"
}

DEF TS TimeSensor {loop TRUE cycleInterval 50}
ROUTE TS.fraction_changed TO RW1.set_floatValue
A list of reason devices that FreeWRL will find is located here.
1.5 Sending note values to a Reason Synth - test 2
The example (reasonButtonPressOut.wrl in the download files) will send notes to a reason file. Start up reasonButtonPressOut.wrl, then start up Reason with the file SubTractor.rns (again, located in the example files).
The FreeWRL window will have two shapes in it; click on the shapes, and notes will play in the reason synth.
A list of reason devices that FreeWRL will find is located here.
1.6 Sending control values to a Reason Synth
The example (reasonSynthControl.wrl in the download files) will send control values to a reason file. Start up reasonSynthControl.wrl, then start up Reason with the file sequencer.rns (again, located in the example files).
In FreeWRL, click on the red box to start/stop the Reason Matrix synth; the balls on the sides of the wireframe move filter and synth mix controls.
A list of reason devices that FreeWRL will find is located here.
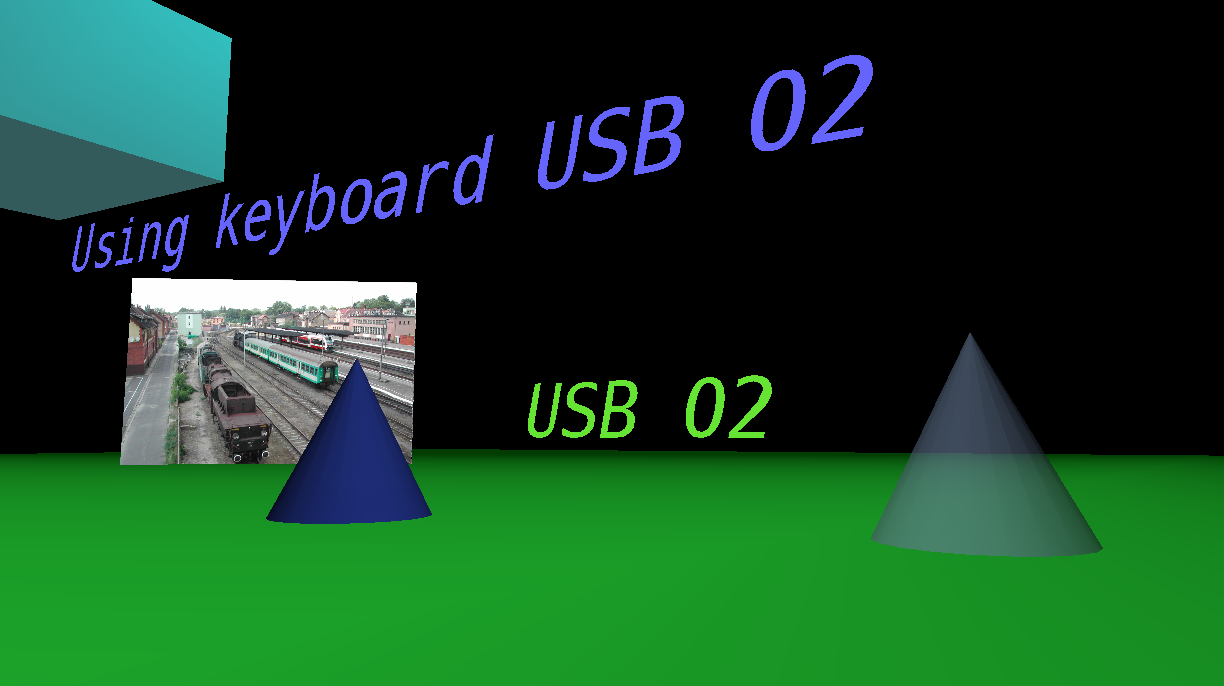
1.7 Complex MIDI Keyboard Example
The example (Keyboard-Test-1.wrl in the download files) will send control values to different aspects of the scene. This has been tested with an M-Audio O2 keyboard, set to the "P-01" setting. (note: Propellerheads' Reason expects this keyboard set to "P-02").
The list of controls are:
- C1 "Sound Attack Time" Change the colour of one of the cones on screen.
- C2 "Sound Release Time" Cone Transparency
- C3 "Sound Brightness" Blue box position
- C4 "Sound Timbre" Change picture on screen (may take a second or two to load)
- C8 "Pan position (coarse)" Navigation Speed
- C9 "Volume (coarse)" Spot Light Intensity
- Keys Pressing keys moves in the world - the "C8" controller controls speed of front/back; keys to the left/right control rotation.
1.8 Using AudioControl to control a Reason Synth
The example (blimpScene.wrl in the download files) will send AudioControl values to a reason file. Start up blimpScene.wrl, then start up Reason with the file sequencer.rns (again, located in the example files).
In FreeWRL, use the mouse to try and follow the blimp that is flying around. There are 3 AudioControl node parameters that are sent to Reason, these are:
- Proximity between you and the blimp sets the Reason Subtractor "Osc Mix" control;
- left/right postioning of the blimp in the screen controls the Reason Subtractor "Filter Res" control;
- difference in speed between you and the blimp controls the Reason Subtractor "Filter Freq" control.
If you want to see the actual code for the above controls, you have to look in the file "helpers/blimp.wrl"; the X3D Scene is fairly large, so the code is split up amongst several files.
Click on the picture to see what the test looks like.

A list of reason devices that FreeWRL will find is located here.
2. X3D Nodes added to FreeWRL
The following nodes were added to FreeWRL to enable intercommunication with Midi devices, and with ReWire-enabled programs.
2.1 The MidiControl X3D Node
We have created one Node for VRML/X3D that allows for MIDI/Reason interfacing. This node:
- sends events when a MIDI/Reason device is present;
- sends and receives button (eg, keyboard) presses;
- sends and receives slider (eg, controller) movements;
- "abstracts" the midi implementation from the user.
The MidiControl node fields are shown in "X3D Specification format" here:
	SFString [in,out]	deviceName	""
	SFString [in,out]	controller	""
	SFInt32	 [in,out]	channel		0   [0-16]
	SFInt32	 [out]		deviceMinVal	0   [0,127]
	SFInt32  [out]		deviceMaxVal	0   [0,127]
	SFInt32  [in,out]	velocity	100 [0,127]
	SFInt32  [in,out]	minVal		0   [0,127]
	SFInt32  [in,out]	maxVal		127 [0,127]
	SFInt32	 [in,out]	intValue	0   [0,127]
	SFFloat  [in,out]	floatValue	0.0 [0.0,1.0]
	SFBool	 [in,out]	useIntValue	TRUE
	SFBool	 [in,out]	highResolution	TRUE
	SFString [in,out]	controllerType	"Slider" ["Slider", "ButtonPress"]
	SFBool	 [out]		controllerPresent FALSE
	SFBool	 [in,out]	buttonPress	FALSE
	SFBool	 [in,out]	autoButtonPress	TRUE
	SFFloat	 [in,out]	pressLength	0.05 [0.0,1.0]
	SFTime	 [out]		pressTime	0
The deviceName and controller fields are SFStrings. These fields map directly to devices/controllers on the MIDI/Reason device. When a MIDI/Reason device is created, controllerPresent will become TRUE. Conversely, if the device is removed from the system, it will send a FALSE event.
The
Two types of controllerTypes are currently supported: "Sliders" - knobs that one can
push and twist, (and send events on changes of values)
and "ButtonPress" controllers - push buttons that send events when the state of a button
changes. The autoButtonPress field indicates whether buttonPress events should be
generated when internal values change. If this is TRUE, a buttonPress event will
be sent for a duration not shorter than pressLength, and the pressTime
will indicate this time in the internal VRML/X3D time sequence.
Values generated from Reason or external MIDI controllers are entered into the VRML/X3D
event loop via the intValue and floatValue fields. The intValue
is clamped such that the value falls within the ranges set by the user (minVal and
maxVal) and the ranges set by the MIDI/Reason controller itself (
deviceMinVal and deviceMaxVal). The floatValue is handled the same,
except that the value is scaled to fall within the range of 0.0 to 1.0.
The useIntValue field is used to determine which field (intValue
or floatValue) is used for events from the VRML/X3D event model.
event loop
The AudioControl is a development on the X3D Sound node.
The fields present in this node are:
We are in the process of finalizing the interconnection between X3D time and Midi Time. We will
publish the results once we are confident that our solution is complete.
Nodes have been added to the Browser method to enable querying (and, thus setting) Midi Controller
information at runtime.
returns an MFString with the list of Midi devices.
if no devices are present, an MFString with length = 0 is returned.
Example:
takes a parameter containing a String. If this parameter is a valid current
Midi device, a list of Controllers is returned as an MFString. If the device does
not exist, or has no associated controllers, an MFString is returned with length = 0.
Example:
takes String parameters; the first is a Midi Device, the second a Midi controller. If the
Device/Controller exists, the minimum value for that controller is returned; if an error occurs,
-1 is returned.
Example:
takes String parameters; the first is a Midi Device, the second a Midi controller. If the
Device/Controller exists, the maximum value for that controller is returned; if an error occurs,
-1 is returned.
Example:
takes String parameters; the first is a Midi Device, the second a Midi controller. If the
Device/Controller exists, the Midi Controller value for that controller is returned; if an error occurs,
-1 is returned. This may be useful to help map physical controllers, where the controller number
is known, with the logical name of that controller.
Example:
DISCLAIMER: All information and programs
presented on these pages is presented strictly on an as-is basis without
an explicit or implicit warranty or guarantee of any kind, not even
for fitness for any particular purpose. The FreeWRL logo is based
on the Linux Penguin logo by Larry Ewing. All trademarks are owned
by their respective owners.
2.2 The AudioControl X3D Node
        SFVec3f  direction       [in,out]  0, 0, 1
        SFFloat  intensity       [in,out]  1.0
        SFVec3f  location        [in,out]  0, 0, 0
        SFFloat  maxBack         [in,out]  10.0
        SFFloat  maxFront        [in,out]  10.0
        SFFloat  minBack         [in,out]  1.0
        SFFloat  minFront        [in,out]  1.0
        SFBool   enabled         [in,out]  "TRUE"
        SFString source          [in,out]  ""
        SFBool   isActive        [out]
        SFInt32  volumeInt32Val  [out]
        SFFloat  volumeFloatVal  [out]
        SFInt32  panInt32Val     [out]
        SFFloat  panFloatVal     [out]
        SFInt32  deltaInt32Val   [out]
        SFFloat  deltaFloatVal   [out]
        SFFloat  maxDelta        [in,out]
Documentation will need to be updated when field definitions are more stable, but for now, please look at
the VRML/X3D Sound node, and the blimpScene.wrl test, above.
2.3 The MidiTime X3D Node
3. Javascript additions
3.1 getMidiDeviceList()
	myDeviceList = getMidiDeviceList();
	print ('current MIDI device list ' + MyDeviceList);
3.2 getMidiDeviceInfo(String x)
	myDeviceList = getMidiDeviceList();
	if (myDeviceList.length > 0) {
		print ('first MIDI device is ' + MyDeviceList[0]);
	}
3.3 getMidiControlMin(String x,String y)
	// get the current Midi devices.
	myDeviceList = getMidiDeviceList();

	// look at the first Device
	if (myDeviceList.length > 0) {
		// get the first controller of that device
		myDev = myDeviceList[0];
		myControllerList = getMidiDeviceInfo(myDev);

		if (myControllerList.length > 0) {
			myCont = myControllerList[0];
			print ('controller has a minimum value of '
				+ getMidiControlMin(myDev,myCont);
		}
	}
3.4 getMidiControlMax(String x, String y)
	// get the current Midi devices.
	myDeviceList = getMidiDeviceList();

	// look at the first Device
	if (myDeviceList.length > 0) {
		// get the first controller of that device
		myDev = myDeviceList[0];
		myControllerList = getMidiDeviceInfo(myDev);

		if (myControllerList.length > 0) {
			myCont = myControllerList[0];
			print ('controller has a maximum value of '
				+ getMidiControlMin(myDev,myCont);
		}
	}
3.5 getMidiControlNumber(String x,String y)
	// get the current Midi devices.
	myDeviceList = getMidiDeviceList();

	// look at the first Device
	if (myDeviceList.length > 0) {
		// get the first controller of that device
		myDev = myDeviceList[0];
		myControllerList = getMidiDeviceInfo(myDev);

		if (myControllerList.length > 0) {
			myCont = myControllerList[0];
			print ('controller has a MIDI number of '
				+ getMidiControlMin(myDev,myCont);
		}
	}